Thursday, December 2, 2010

fresh cranberry wreath (aka dumbest idea ever!)


It really was the dumbest. project. ever.

My fingers still hurt. It took hours.

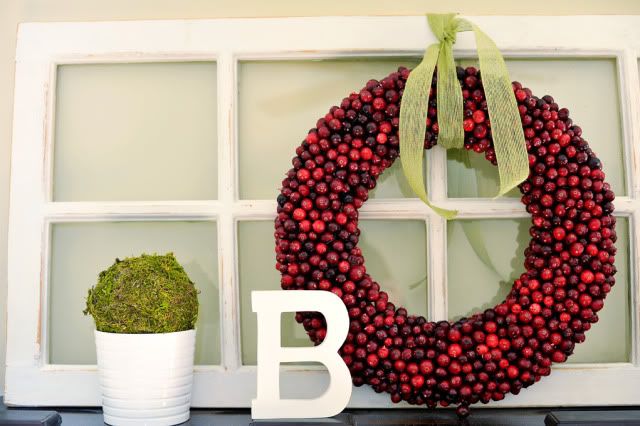
But here it is, in all of it's glory. Behold:

The Fresh Cranberry Wreath.

My insanity started when I saw the Target version last weekend in the Smith & Hawken section. It was bout $40. It was gorgeous, but I said "Oh, I can so make that... and I can do it cheaper!" and my hubby said "I like cheaper, you run with that!" So I did.

I did do it cheaper, my version cost about $15. But I don't know that it was really worth it.

Because he loves me, and he's really the best hubby ever, he sat at the kitchen counter with me for an hour and a half last night breaking the toothpicks and poking the cranberries for me. We made ourselves a nice little assembly line. I'm pretty sure he saved me hours! It was fun to sit and talk while we worked, but I kept stopping to complain. The toothpicks kept popping through and poking my thumb and index fingers. They throbbed when we were finished.

I started this project in the afternoon, stopped for dinner, continued after my little boys where in bed and didn't finish until about 12:45 AM. Stupid insanity. Next time I'll shell out the $39 and go to bed early. :) I'm serious, this probably took a year off my life.


It does look like I wanted it to, though, and it is really pretty. I like it better today than I did last night.

If you've got time to waste and you like stupid craft projects, here's the run down on what I did...

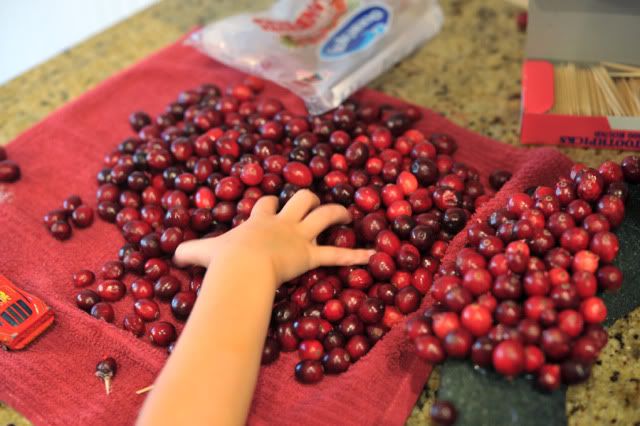
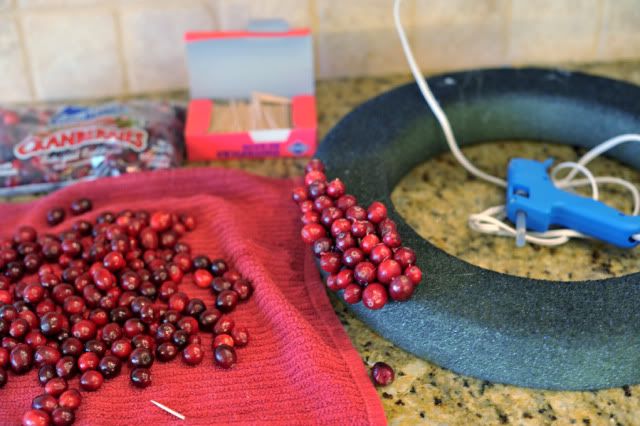
Get yourself lots and lots of cranberries. I used 5-6 bags. I found them for $1.50 at Wal Mart. They were about $3 at my Smiths, so look around for a good price. I spread them out on a towel to help them dry a little, I had a little help. :)
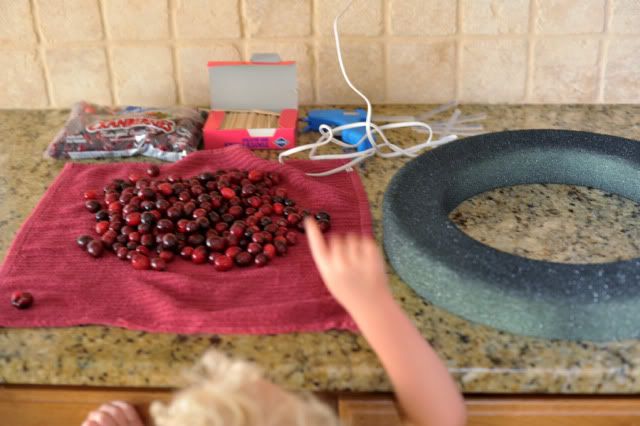
All you need is a bunch of toothpicks, break them in half and poke the cranberry through the broken end, put a dob of hot glue on the end and stick it into a foam wreath. I spray painted mine black (red would be better, but I didn't have red) just so the green foam wouldn't jump out and draw your eye in. You can't really see it in most places, the black just looks like shadow.

So it's break, poke, glue, stick in foam, REPEAT. :)


And about a half hour in you'll wonder why you didn't just spend $40 and buy one at Target.

I'm going to try and save it so it's not just a one year deal, we were thinking last night that if we let it dry out just a little bit and spray it with a nice coat of poly that it should help the cranberries keep their shape instead of shriveling up. I'll let you know if that works.

Happy wreath making buying!

Wednesday, December 1, 2010

Our Christmas Tree

I'm back! I know it's been a while since I've really posted anything, I've had a very sick little boy. He was nearly hospitalized over Thanksgiving, he's had pneumonia and a few other yuckies, but he's doing much better. It's nice to have him healing and have life back to "normal", it was crazy there for a while!

I'm excited to share our Christmas Tree this year, we've added a few more fun ornaments, each year we add a new picture of our boys in a little ornament frame. We added more colors to the tree this year. We kind of had to. A few years of toddlers running around really took a toll on my ornaments.


So on Monday, the boys and I went to Target and purchased a new star (ours was cute, but it wouldn't stay on anymore. We fought with it for weeks last year.) I chose this little vintage looking beauty...


And we added some more bright and colorful ornaments in mostly red, green, blue and orange, but there are a few other colors in there too.


Our yearly picture ornaments look right at home with all of the fun bright colors. I even found some cute little clothespin children with fun little hats and sweaters in bright colors. The boys helped pick the ornaments, they both liked the glittery snowflakes.

I took these pictures while Carter was at school, and Owen really enjoyed "helping" me out. He kept asking "did ya get a picsha of this one?" and pointing to each ornament he could reach. :)

My husband and I were married in Nov of 2004, our colors where a rusty orange and a bold red. That first year as newlyweds I had a ton of red and orange ribbons left over, so we used them on our first tree. Every year after that I added to my orange and red theme.
As our boys came along, we added a silver booty with their name engraved on the bottom for each boy, and each year we've added a new photo frame ornament with a recent picture. I noticed last year that our tree was sure looking naked.

We knew we needed more ornaments, and rather than buy all orange and red again, we decided that we don't want a matchy tree now that we have our little fellas and they're getting old enough to make ornaments, we want to include their homemade ornaments year after year, and with that, we decided to add more colors to the tree.

We went from pulled together and coordinated to bright and colorful and a little crazy. I was nervous about it, but I like the change, it's been fun!

But mostly I just like that we'll add to this year after year and have a tree full of our kids art work and our colorful memories.


Merry Christmas!

Next up:
The Mantel!

Monday, November 29, 2010

so excited!


I'm totally geeking out over here! I just got an email tipping me off about this...

Carter's room is up on Ohdeedoh today! I'm kind of surprised about this, but so stoked! Go check it out, I don't know how long they leave these up, so it might be short lived, but we are so excited!

http://www.ohdeedoh.com

Wednesday, November 10, 2010

what's on your walls?


I'm so inspired by wall galleries! I'm really digging these lately. The photographer in me just can't get enough of having portraits and photographs everywhere. I ran across this beauty in a pottery barn catalog I had from a while ago. I'm DYING over that yummy brown paint, even though I tend to be a light paint person, I'm LOVING the way it pops against the white trim. This has me wishing my basement stairs where even MORE open, we opened up the stairway as much as possible, but I want to do something like this. I'm so inspired by this space. I love the contrast of the industrial looking light fixture with the more traditional wainscot and banister, and HELLO orange striped rug, you are gorgeous! I tore this page out of my catalog and I've been staring at it a few times a day, just analyzing what makes it work so well.

I went looking for more on the pottery barn site and found this useful little guide to making a wall gallery:


Can you tell what's on my mind lately? Right now our basement projects are taking up most of our time and energy, but I'm still thinking about how to make a great display of favorite family photos in our family room.

I think I'm going to wall ledge route for above our couch, I love that even though there are a lot of pictures, it still looks "clean" and collected.
I'm thinking it's time to get to work. The hardest part for me will be choosing which photos to display. I love all of our pictures, and when the time comes to hang them up on the wall this is always the biggest challenge for me.

Mine might end up looking like this:

Which is lovely, but in real life, it's just a tad too much. Nice for an ad though.

Real life would be something more like the one Lindsey (the pleated poppy) has in her dining room:
I'm in love with her whole house, actually.

If you'll notice, the majority of these are black and white images. I see the logic behind it, they all match and go together, but I'm kind of a color junkie. I don't know if I could commit myself to doing all black and white.

Have you done a wall gallery of any type? I want to see it! leave me a link in the comments and I'll come check it out, I'm on the hunt for more inspiration! (if I were a REAL home blogger we would have a real linky party, but I'm just a little "how I'm decorating my new house" blog, so this will do!)

Monday, November 1, 2010

our humble {housiversary}

Last week we passed the year mark, here at our humble little abode. It's gone fast, and I think we've come a long way with making this the house we hoped it could be. It's been a fun little start to our journey here, and we have lots more we still want to do.

When we saw this house our old house wasn't even on the market yet. We were trying to decide what to do and I found the MLS listing for this home:

Maybe you can imagine why my hubby wasn't too interested to come and check it out. It lacked curb appeal. It had been unoccupied for a year or so. We wanted a home with lots of character, we wanted a perfect area. We took a drive from the suburbs of Salt Lake where we lived to this small town, it feels like "the country" compared to where we were before.

It was about 400 square feet smaller than our previous home, we went from 3800 sq ft to about 3400. Everything was beige inside, a blank slate, but definitely lacking in charm and architectural details that we love. It had a bigger back yard, we went from .25 to .35, which was a plus for us. It backs a fenced canal that runs from a canyon, but the plus is that it's being put underground starting this month, and a bike/running trail is going over the top of it, which is a big plus for us, we can't wait to take our bikes right out through the backyard and onto a trail that goes for a long way into a canyon.

The first time we drove through the neighborhood I knew I wanted this house. There were kids all over the place, super nice neighbors, and I just felt like I could see myself calling it home. I joke that we bought this house for the park down the street with tall trees and a little creek that runs through it. I'm half serious about that. I wanted it before I even saw the inside and we kind of agreed that it would take something really bad inside to change our minds, like a terrible floor plan or something that couldn't be changed. But we walked through and though it was plain, we saw potential.
A year later we still have a long way to go, but it's closer to what we hoped it could be.

Here's a look back at all that has changed over the past year.

From the main pictures you can see the shutters we made, so I won't re-post those pictures.

We replaced the cheapie blinds that were all over the house in most rooms, I still have bathrooms and the living room left to replace.

Front Door
before:

after:

Formal living room
before:
after:
I haven't touched this room at all, aside from putting things in it, no paint or anything else has been changed yet. As you can see, we use it more as a living room/office combo. when the basement is finished the desk will go down into a real office and I have a piano that my grandma gave to my mom and now my mom is passing it to me. It needs refinishing, but I'm really excited about it. we'll put that in here and I'm not sure what else we'll do with this room.

Big Boy Room
before:
after:


Little Boy's Room
before:
after:
(his room has changed even since these pictures, he moved into a twin bed and out of the crib.)


Master Bedroom


The master bedroom is almost finished, I'm waiting for a nightstand on back order, and still working to solve my chair problem mentioned last week. :)

Family Room


I haven't done much with the family room, I'm kind of waiting for the basement to be finished, then I plan on sending these couches down stairs and starting fresh with something lighter upstairs. I feel like I need a fresh pair of eyes in this area, I'm not 100% sure of the direction I want to go, but I have time and it's okay for now.


Basement
before:
after:
we are getting so close down there! We've actually progressed past the point of this picture, the walls and ceilings are all primed and painted.

The hubby and I went down last night and put extra breakers in all by ourselves! We have a little bit more electrical work to do, trims, doors, banister and stair stuff and then the big one, carpet and then all done! I can't wait to start enjoying it!

Backyard

after:
It speaks for itself. Grass is about the best thing that happened to us all summer long! We love it. Scott did the sprinkling system himself, I helped dig some trenches, but he did most of that. We chose to hydro-seed and we were amazed at how fast it grew! We are hoping to build a pretty pergola over the patio next summer!

So the things I hope to do in the near future:
We've had hardwood floors in our past homes and really love the look and practicality of it. I have visions of something like this throughout the main floor:

of course lots more trim work, of course finishing the basement and moving our leather furniture down stairs, slipcovered couches for upstairs, move my piano in, figuring out what I want out of the family room, and of course I will always be imagining taking my kitchen from this:
to this:

or something close to it, consider this a conceptual drawing. :)

I have lots of other little things planned, and the more we get into it, the more I'm loving it!

Happy Housiversary to us!